
I've decided that I'm going to expand my blog to all of the Creative Arts- after all I am a Creative Arts Therapist. I've been out and about checking out new things/events in the community. Here are a few adventures I've participated in:
ROC City Roller Derby- http://www.rocderby.com/
The Manshee Chronicles (Improv)- http://thespacerochester.com/2011/03/the-manshee-chronicles/
Pinapple Jacks for a concert by Mulletude- http://www.facebook.com/Mulletude
First Friday- Citywide Gallery Night- http://www.firstfridayrochester.org/
Nazareth College Senior Recitals- http://www.naz.edu/music/students/senior-recitals-spring-2012
The Acapulco group Call for Backup at Nazareth College -
http://www.youtube.com/watch?v=PrsZpcCm_bw
Sunday, April 22, 2012
Saturday Afternoon Art: I Wish I May, I Wish I Might...

She had these great watercolors that looked expensive but created vibrant colors. I decided to test them out. I'm not really good at watercolor but I like to really wet the paper, put the ink down and then rotate the paper to just see what kind of magic happens. I then played with some iridescent acrylic paints and stamps for some added texture. I've been wanting to create a fairy of sorts for a while but as you can see I've been more into abstract art and since it's been a while since I've actually created an actual image I was nervous. I used watercolor pencils and started forming the fairy. I ended up using a fine tip permanent black marker to make her stand out more. You can tell I was insecure at first while creating her because she is so small compared to the large paper. In the end I wish I would have created her larger. Perhaps next time. I added some already created wooden circles and star to the image for some additional dimension. Then for some reason the Star Light Star Bright words popped into my head. Maybe because I've been wishing for something for a while now and wish it would come true... Again, I'm amazed at the unconscious that comes out freely while I'm creating. Most of the time I don't recognize what my art means until I'm done and sit back and reflect on it. Then I'm like, "oh yeah that makes since...that's where I'm at emotionally right now."
I'm pretty happy with the outcome. It was really fun, I got into the zone while creating and as an added bonus I don't dislike what I created!


Wellness
One of the Art Therapy groups I've been facilitating ended this past week. I asked group members to reflect back on what the group experience has been like for them. I created this image to share in the reflection. I don't know if this is a quote already out there in cyber world or something that was created by someone. I saw it next to a mixed media painting at the Mental Health Coalition while I was there as a juror for the "Metamorphosis" art show coming up May 6th. I thought it was a great way to close the group.


Another Yarn Wreath

Tuesday, April 17, 2012
Scribble Art

I didn't have anything particular in mind when I created this image. In fact I didn't know what I wanted to create, so I set out to create a scribble drawing. To do this activity you take a piece of paper and pencil, place the pencil on the paper and without lifting the pencil create a continual line/scribble all over the paper. Sometimes it's best to close your eyes when you do the scribble part. Then you turn the paper over and over, looking at it from all different angles until you start to see an image within the lines of the scribble. You then take those lines and create your image. You can color it in using any art medium (colored pencils, markers, paint, watercolors).
I realized after creating mine that prior to creating I had been talking with others about my recent trip over Easter weekend to visit my family and celebrate my nephew's 5th birthday. There's magic in the scribble drawing because it's neat to see what comes out of it. I think unconsciously I had continued to think about this great family visit and perhaps made myself see a bunny in the image.
This activity is great for any age. It would make a good classroom, family, friends get together art party, etc... activity. I would say it is good for ages 7/8 on up. It's neat to see what everyone comes up with and it really allows each person to use their imagination.
Saturday, April 14, 2012
Yarn Wreath Made Easy

I've seen these yarn wreaths on pinterest and they all look really pretty. I found a tutorial;
http://www.danielleburkleo.com/2010/10/diy-yarn-wreath-with-felt-flowers.html and set out to make my own.
I went to Michaels Craft store with a 50% of coupon and purchased a straw wreath for 5 dollars. I kept the plastic on it. Used some thin colorful mohair yarn that I got for free from a friend and wrapped the yarn around the wreath. And wrapped and wrapped and wrapped (this took about 45 min. but was mindless work and kind of relaxing). Then I made flowers out of felt. I would say this took the longest and was more difficult (for me at least). As you can see in my pictures I started out with a different set and color of flowers but wasn't sure if I liked them with the yarn I used so I made a new set with different colors and styles. My best suggestion would be to experiment with the flowers. I found it hard to follow the tutorials so I just ended up creating my own by experimenting.
I should mention my one fatal flaw... After tying off the final yarn I had a brain fart and thought I needed to use the felt flowers to cover the knot and end of the yarn (even though this was on the back side). Therefore it wasn't until I was done hot gluing the flowers on that I wondered why my yarn didn't seem as straight and perfect and gaps were showing through to the straw. Yep... you guessed it I should have flipped it back over and glued the flowers on the front side that I had focused on making straight and full with the yarn instead I wasn't thinking and finished the project on the backside. Let's just say felt, hot glue and mohair yarn aren't friendly if you need to take them apart so I just made due with the backside and tried to move the yarn around to fill in gaps. Really I'm the only one that will probably notice the flaw, but still....


Wednesday, April 4, 2012
Inexpensive Wall Decoration

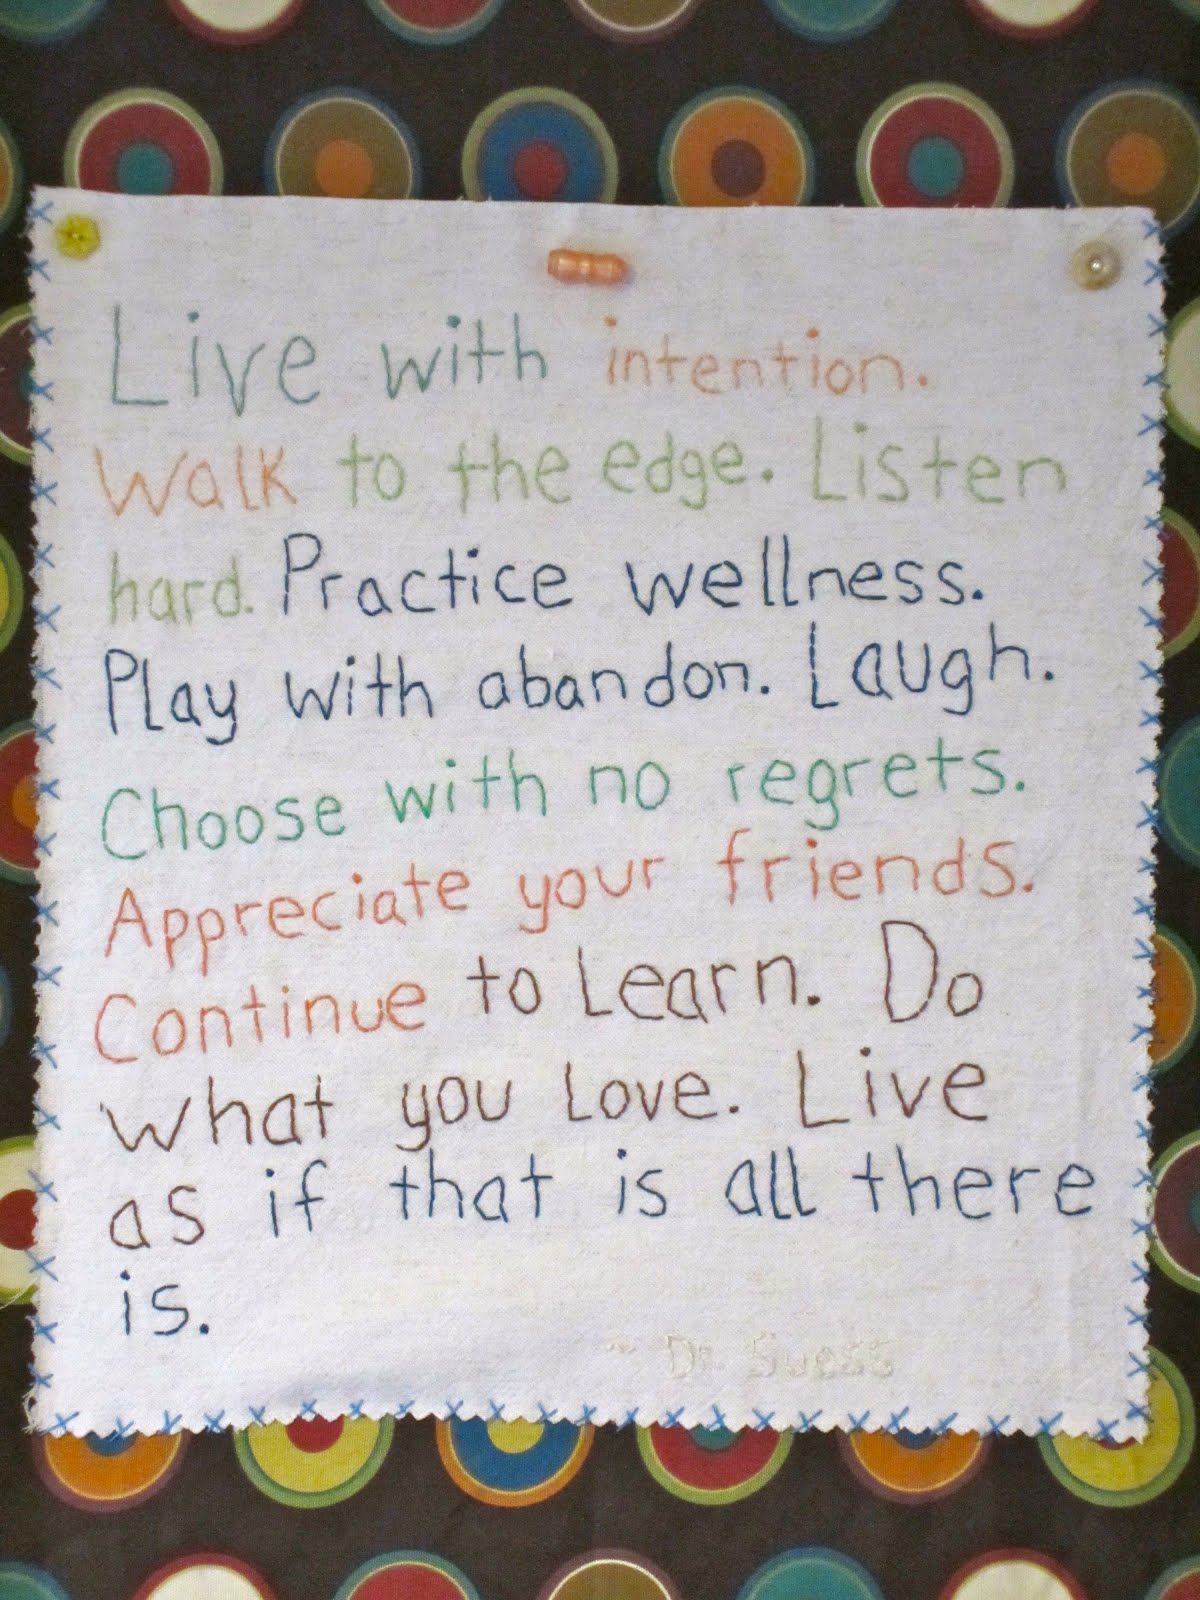
The concept of this project began with a group directive I facilitated. The directive was to think of your life motto/inspiration that has helped you. I began by creating an image of a hanging quilt inside of a large vintage wood frame with a quote on the quilt. This image eventually led to this project. From inception to completion it took me about a month.
I first found a very old very large wooden screen frame from my 1930 home that I found in my garage. I tore the screen out, took the hardware off, filled holes and began painting. I've been looking for a piece for my bedroom in the sitting area. I decided to use a color that would bring out the blue accent wall that my bed frame is against (so I used the same color paint as the accent wall). On a visit to Craft Bits and Pieces I found this remnant material for .25 cents and the off white piece for .25 cents. I got some vintage buttons for .50 cents. I came home found this quote by Dr. Suess that I liked and embroidered it on the off white cloth and zig zagged stitched the off white piece to the larger fabric. The original wood frame was about 4.5 feet tall and 3 feet wide. As a result the main fabric wasn't tall enough so I sewed on some vintage looking decorative fabric to the top and bottom. I already had doubts about if this would look good but went with it. To finish the piece I used a hefty stapler and stapled the fabric to the back of the wood frame.
OUTCOME: didn't like it! The frame was to big and with the added fabric it didn't look good. So I was frustrated and let it sit for at least a week. Eventually when I tackled it again I took another old smaller screen frame from the garage and repeated the above process. I had to rip the fabric off the original frame, cut it down since the new frame is about 3 feet tall by 2 feet wide, and re-staple. OUTCOME: Much better! Better enough to actually put a hanger on the back and hang it in the intended location. Total price of entire project $2!


Sunday, April 1, 2012
Growth Means Change- Mixed Media Collage

I originally saw something like this (the yarn for flowers) on a post on pinterest a while ago but couldn't find it again to give credit. I was facilitating a group this past week where the directive was to think of a past regret and then consider your thoughts and feelings about that regret currently after time may have passed. Group members were asked to create an image of their current thoughts and feelings.
I began to create this image and finished later in the week. My thought process was that while I may have regretted a situation or how I've handled it in the past I still believe I can learn from those regrets and in the future I can perhaps handle things differently to avoid a future regret.
I used very watered down watercolors on canvas as the base. Then used yarn and vintage buttons to create the flower. Then I took a very old book and ripped up a pieces for the stems and wrapped embroidery thread around the stems. I chose to use a foam stamp of leaves and watercolors to create the grass/leaves on the image. I took glitter glue and dabbed it on a paintbrush and spread in between and around the flowers. Finally a permanent marker to write the quote on the top half.


Subscribe to:
Posts (Atom)

