Search This Blog

Creative Casey's Blog

Friday, November 25, 2011

Dr. Seuss Inspired End Table

Original Table
I found this end table a few houses up from mine out for the trash. My wonderful boyfriend amused me by helping me to carry it back to my house as I had visions of "trash to treasure" when I laid eyes on it. It was pretty beat up and I didn't notice the hideous leather circle on top until we got it in the house under the light. The first thing I did was was take a pry bar and hammer and get the leather circle off. Then the table sat in my basement for a few weeks not only until I found time to work on it but mostly because I was clueless about how to salvage and refinish the table with the indented circle on top.

Eventually I just had to tell myself it was free so I should experiment all I wanted and the worse thing that would happen is that I put it out on the curb for garbage. So I went to town using materials I already had (the paint, sand paper, crackle finish, vaseline, etc...). I tried some techniques I found online and had wanted to try such as using vaseline to create a distressed look. This didn't look good but I found where the vaseline didn't get wiped away completely it helped to turn things yellowish and helped it to look aged. I ended up using many techniques, sanding worn areas, the vaseline distressed look and a crackle effect. It ended up looking pretty aged in the end.

The circle I of course let blank until it was the last thing to work on so I started by painting it a beige color. Then I took old sheets of music (which I'm sure someone out there would throw a fit about) and ripped them up and decoupaged them to the top. Then I took some images that I had printed out and traced the body of a bird on them, cut them out and placed them on the top. I used a permanent black marker to draw a telephone type of line on the top and to create the birds legs. I used permanent marker to write the Dr. Seuss quote around the birds. The quote reads "Today you are you, that is truer than true. There is no one alive who is youer than you."

I took watered down acrylic brown paint and washed over the circle and then put a clear satin polyurethane over the entire piece. I did many coats on the top and finished it off by pouring a lot of polyurethane onto the edges of the circle were it was indented. The goal was to fill the indention up to create a flat surface and to help make sure the paper would be securely locked into place. A bonus was the edges of the circle became a darker brown than the rest of the circle where there was more polyurethane which helped to aid in the aged/weathered look.

Overall it turned out pretty good and was a positive challenge. By using almost all materials I had around the house I was able to complete the entire project for $5. Purchased materials were drawer knob on clearance and having to buy more crackle finish.
Finished Table


Wednesday, November 23, 2011

Turning Art Into Gifts!

I'm running an Open Studio Art Therapy group at work this semester and it's going really well. Here's one of my own pieces I worked on during the semester. It's on a canvas board and started with old music sheets, watered down acrylic paints and some left over transfer images, stamps and the inside of a bag of tea.

I think it turned out pretty well and quite a few of the students in my group said that I should frame it and give it away for a holiday gift so I took their advice and found this frame at Hobby Lobby; http://www.hobbylobby.com/ for 50% off which met I created this entire project/gift for $15. Not bad!


Sunday, November 13, 2011

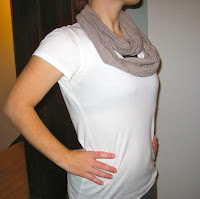
My 5 Minute Scarf

I saw this project/tutorial on Reddit Crafts; http://www.reddit.com/r/crafts/ and thought it looked easy and fun. I finally had a chance to create it today. It was sooooo easy and fun. I would definitely recommend this project to anyone. I went to the Goodwill yesterday and purchased this XL men's GAP shirt for 5 bucks (little pricey) but it was the only one I really liked. The material is very soft and light and the pattern was perfect (brown and white tiny stripes). I would provide the steps here but here is the original Reddit Craft post where the person already gives you step by step instructions;
Below are pics of my starting shirt and views of the finished product. Can't wait to wear it!


Handmade Sterling Silver Ring


In keeping with the intention of continuing to explore and create art, I decided to sign up and take a Sterling Silver Ring making class through a community art shop. This class was through the Memorial Art Gallery Creative Workshop;http://mag.rochester.edu/creativeworkshop/. This was my first time going to this community art center.

I've always wanted to create a ring myself out of metal; but for those people who know me my attempt to audit a graduate level jewelry and metalsmithing class turned out to be a big flop. I did complete a solder plate before dropping out (mainly because the class was completely over my head). This was a big disappointment to me because I just wanted to make a simple ring. So when I found this community class online where you make your own ring in a one day 3 hour class I signed up!

I found out that I had learned something from that graduate level class. I understood the language, general technique and wasn't afraid of the torch any longer. The actual material to make this ring was one piece of 16 gauge sterling silver wire for $5.50! The demonstration was about an hour so I made the ring in about 100 minutes from start to finish. Below is the final product. I was very pleased and really excited about the outcome. It looks and feels professional!


More Toys...


I've continued making toys for The Toy Society; http://thetoysociety.blogspot.com/. Here are some of the new toys. the later (colorful stripped ones I'm actually giving to my two little nieces for Christmas. I practiced with different materials and stitches on these toys. The stripped ones I actually made from a pair of stripped socks. The material was really stretchy and a little challenging but turned out pretty good.


Saturday, November 5, 2011

The Toy Society

I found a conversation on reddit.com/r/crafts a few weeks ago about charities and using your talents to donate handmade goods to these charities. I found the following link for "The Toy Society"; http://thetoysociety.blogspot.com/ and decided this looked like fun so I joined.

The basic philosophy is to create toys that are child friendly, put them in a ziplock bag with a letter explaining about the Toy Society, take a picture of the toy and post it at the "drop box" on the Toy Society website and where you made the "drop". Then hopefully a child or really any person who finds it can log onto the Toy Society website and post a picture or comment about finding the toy. It's a way to hopefully brighten someone's day.

I decided my goal would be to first participate in the Christmas drop, so I've made two toys for that. Then I'd like to create a total of 4 more toys and when I visit with my 4 y/o nephew around New Year's I'm going to have him help me with finding some good drop zones (since he's a frequent flyer at many parks, the Y, and libraries). I think he'll think this is pretty neat.

So below are what I have created so far. I've handmade them using felt and patterned cloth as they are forgiving and I'm not an expert at sewing or creating toys. What do you think?

Oh, on Halloween as I left my driveway I noticed an orange decorative bag on my door step. It turned out to be a "You've Been BOO-ed" greeting. This is similar to the Toy Society drop and find philosophy. The bag had a card and closed store boughten chocolate chex mix in it. You can check this out at; www.BeenBooed.com.


Collage: Mail Art Continued

I finished my community art class about 1 week ago. Below are some updates on other techniques I learned in the class. And things I have continued to make using these techniques.

This was my favorite photogram. It's hard to see but it goes with my bird schema I've been creating lately. It was just a flat paper image of a bird cut out and the background on the paper looked a little veiny. It looks perfect in person and I'm planning on framing it or doing something to showcase it in the future.


Darkroom day! These are already made postcards with the appropriate marks on the back side. You just lay objects down for about 4 seconds in full exposed light, process and there you have it. This was very easy and fun but requires darkroom access. This is called a photogram.


We learned to make decorative envelopes from scratch and how to jazz up a plain store bought envelope. You can find patterns for envelopes on the internet or create your own. *A key is to use glue tape! Works wonders and completely sticks together without wrinkles, having to wait for anything to dry, and totally not messy!


This is using watercolor paints and a sponge, plus stamping, embossing and transferring.

I decided to hand make all of my Christmas cards this year.