

Oh boy... so with the first two weeks of my summer break I spent time each day touching up minor nagging house projects that had built up since last summer. Not fun! So when I finish all of those projects what do I do? Start another one that's bigger!
For the past 3 years I've contemplated and wanted to have a patio to put my table and chairs on. For 4 years they just sat in the yard and I have to move everything each week I mow and then move them all back. It's a bit of a pain, but perhaps worse than that is that while I'm not heavy and the chairs don't sink into the ground when I sit in them it happens all of the time with my guest. They end up sitting lopsided and/or leaving deep pit marks all over the grass.
So, while visiting my friend for our weekly walks I noticed she had a bunch of brick pavers left over from having a large sidewalk put it. I asked her if they were going to use them and she said she was sick of having them around. While she and her husband were going to give them to me for free I instead felt better bartering. I babysat for them and they gave me the bricks.
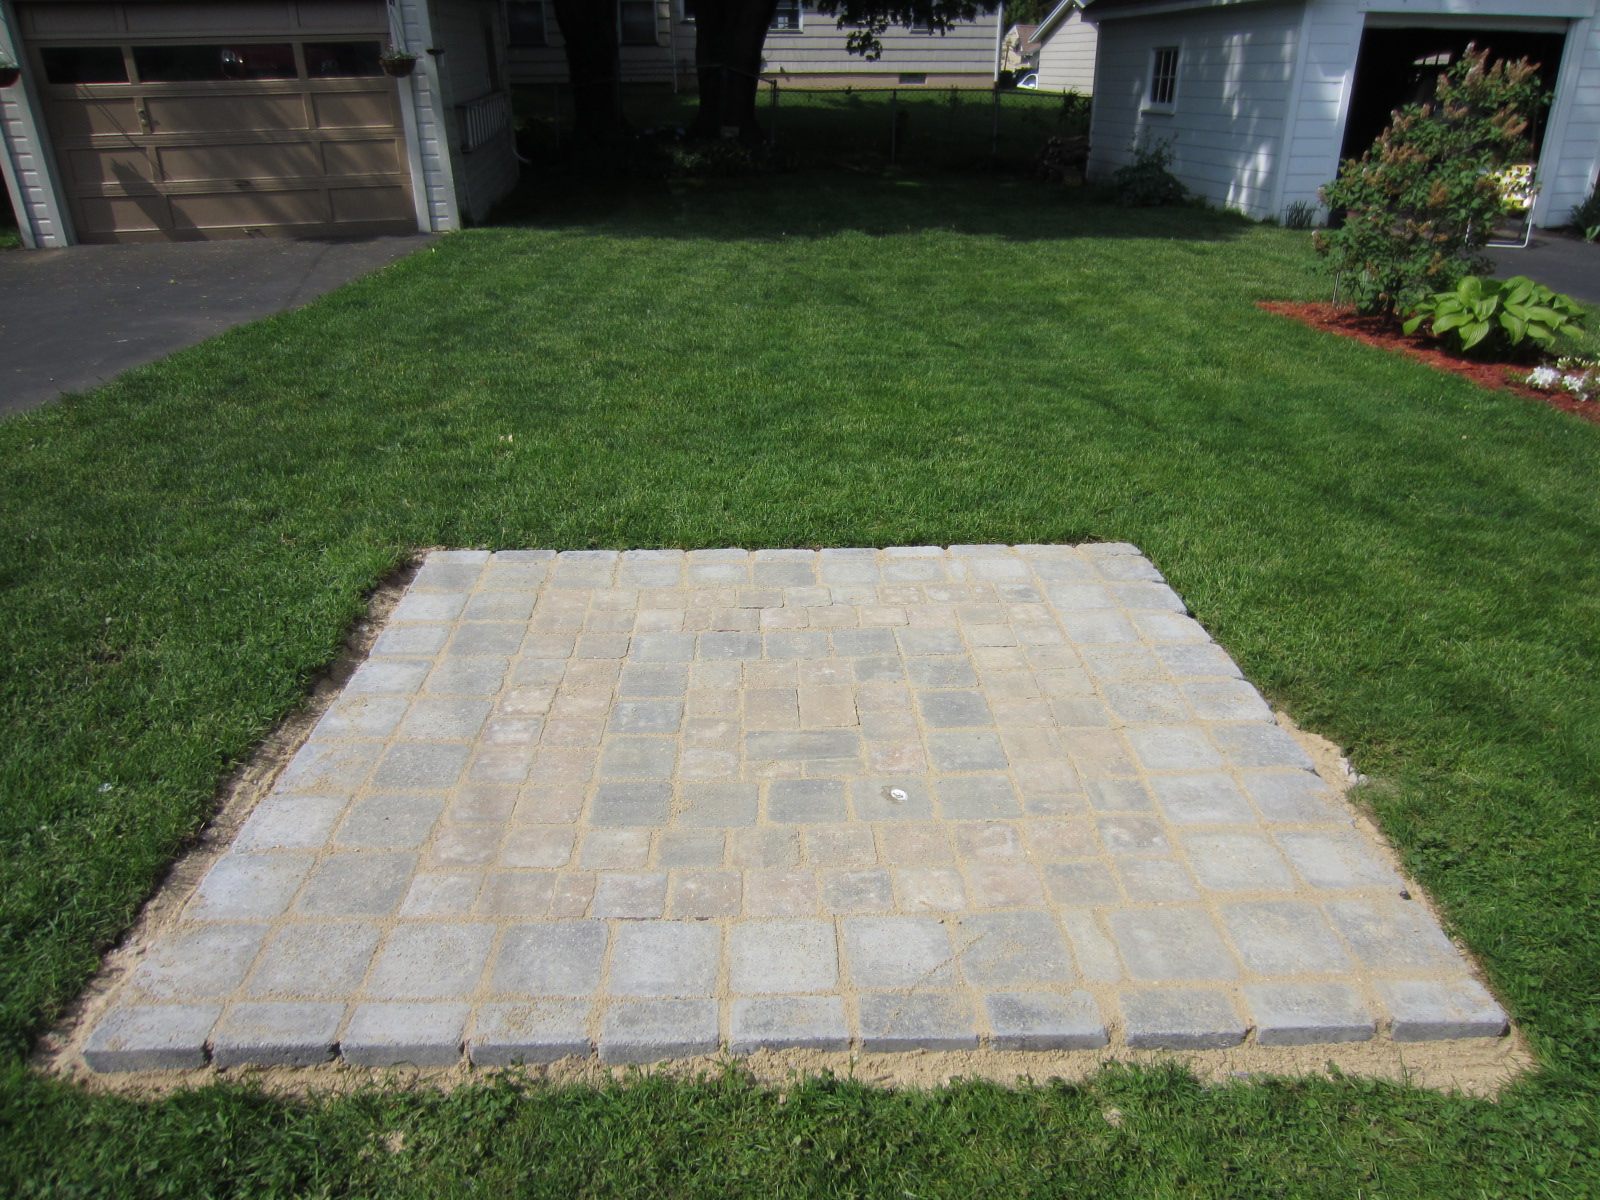
This set me on my next and I swear last home project! My brother-in-law gave me directions on how to create a correct brick patio. Ugggg... After mowing the lawn one day I needed to measure and mark off the area I wanted to create the patio. Once that was done I found the energy, got the shovel and started digging and digging and digging (about 4" down is needed). Luckily neighbor Bob had a crater hole in his back yard that he'd been trying to fill for years where a tree removal left a soft spot. I borrowed his wheelbarrow and hauled the dirt over to his crater. This was touch work and exhausting! Took a couple of painful non stop hours until it was all dug out. I ended with about an 9x9 square perhaps slightly smaller.
The next day I spent making 6.5 trips to HD (yes that is a half trip- half way home I forgot the main thing I had went there for and had to turn around). Because I have a small car and while I often times use it like a truck I didn't want to break the springs on it by putting to much weight in. So a trip to HD
for 7 bags of crushed rock, then a trip for 8 bags of sand, then a trip for bricks (since while my friend had a lot it wasn't enough), then a trip for more bricks and sand, and so on. I should mention that perhaps the worst part of the entire project was that there was no one around at HD to help me lift anything and I'm pretty small. So I had to lift all of those materials each time onto the cart, then into my car, then out of my car to the grass, etc... over and over and over again. By the end of the day I had to make a trip to CVS to grad some icey hot because I was soooo sore!
The process after drinking about 4" of dirt around your desired patio area is to put at least 1-2" of crushed rock down as evenly as possible, then about 3" of sand on top of the rocks to help with leveling the bricks later on. Then you put on bricks starting from the center and working your way out (I should mention that the previous evening after digging I laid out all of the bricks I had to help decide on a pattern and to have an idea of how many more bricks I would need). However; this part is tedious because you have to use a leveler and make sure the bricks are level to each other and you do this throughout the entire process. I used a soft mallet to help tap the bricks into place and level them. When all finished you take sand and pour over the bricks and use a large broom to push the sand into the cracks. I then sprayed water on top, waited for it to dry and settle overnight and then filled in with more sand. I had to do this again about a month later as things continued to settle. Oh, I also bought a couple of bags of top soil (since I gave Bob ALL of my dirt) and filled around the sides (typically you would build right to the grass so it would automatically hold the patio in place but I didn't feel like buying more bricks so I spent two bucks on top soil and packed it in good around the outside. Grass is already working it's way into the top soil to firm things up.
The outcome was pretty awesome! If I wanted to spend more time and money then I would make about one more row all the way around and I would go all out and create an above ground fire pit but nope not gonna happen (unless I get some more free bricks). :) Overall, the project cost $150 and would have cost $300 if I had to purchase all of the bricks and this was creating it all myself (well I have to give props to neighbor Bob who came over and helped me with the leveling of the bricks for a couple of hours that afternoon).
I love my patio and it's incredibly wonderful to not have to move the furniture every time I mow and to not have to worry about sinking in the ground if it's been rainy and wet.
Sorry, I wasn't so good about doing before and during pictures. Just focused on getting this project done.


Oh this is another entire project. I need an umbrella base. My neighbor gave me an old flower pot and an extra piece of pvc pipe he had, then I mixed up some concrete I had around and filled in the pot about a third of the way up adhering the pipe in it. Waited for it dry, bought some petunias to put it in and drilled holes in each side of the container for water drainage. Works wonderfully, cost about 4 dollars and looks beautiful!
**Update as of 8/12/13- I did end up spending $13 at HD to purchase some quick sand cement grout. It's a fine sand that you brush into all of the crevices and then lightly water it down 3-4 x's in the first hour. It then hardens and stopped the sand and bricks from moving and weeds/grass growing up in the crevices. I also poured it around the outside frame of the patio also and it seems to help keep the bricks in place and is keeping the weeds from covering over the edges. This stuff works pretty good. Would recommend for brick patio work.


Patio looks great!
ReplyDeleteThanks for the feedback. It was a valiant effort and is a solid start. I'm sure it or rather I will make changes over time.
ReplyDelete