Search This Blog

Creative Casey's Blog

Thursday, December 22, 2011

DIY Coasters


I found this idea on pinterest.com. Here is the exact pin that Lindsay Schmitz posted with how- to instructions; http://pinterest.com/pin/41095415319262957/. This was so easy and fun that it can be addictive. I wanted to keep creating and creating. You could create so many different styles simply by using tiles that are different colors and sizes and scrapbook paper that has different patterns. For this I used the original tiles suggested from HD and yes, they were only .16 cents each! I had just purchased a brand new package of awesome color/pattern scrap booking paper at Craft Bits and Pieces (http://www.craftbitsandpieces.com/) for 2.50 and now I got to try some of it out. Then when I was at ReHouse Architectural Salvage (http://www.rehouseny.com/) store getting some old glass jars for another project (posted prior to this one) I found these great smaller tiles in the FREE section. Hooray for me! I wanted to take a ton of them but only took a couple of stacks. Below you will see the difference in tile size and the smaller tiles had a different overall shape and background color.

You could also carry this concept further and get even smaller tiles, use the same method and then put quotes or other images on top of the scrapbook paper and create magnets. Hmmm...I see another experiment coming on...


You can use a spray finish or since I had liquid varnish laying around I just used that.

I had some small felt stickers that I hot glued on or you can easily use regular felt and make circles for edges or place felt on the entire bottom.

Original size tiles suggested.

Smaller tiles.

So you can see the size difference.

Candle Light Party Decor

I went to a Christmas Party last weekend and our friends house was decorated with tons of old glass jars on along their porch, inside on the mantel, and going up their wooden stairs. It looked so picturesque that I decided I wanted to try something like this. I had a few glass jars around, found one that was most likely 40 years old or more in my basement with turpentine or something toxic in it that I washed out and then I headed to one of old house part stores in our city called; ReHouse Architectural Salvage- http://www.rehouseny.com/. I found about 3 more unique old glass jars different shapes and sizes and a huge bonus was when I went to pay at the end it should have cost $5 but once the assistant found out what I was going to do with them he asked if I was looking for any more. Upon saying yes, he showed me a secret stash of glass jars but they were labeled as $10 each. I told him thank you but I wasn't looking to spend that much on this project and he gave them to me for 90% off or rather $1 each!

I got them home, cleaned them up and put them on my mantel and bookcase. Here's some pictures. One was enhanced to show the picture more. My plan is to leave them up after the holidays and once in a while when having a party or just when I feel like it lighting them up. My one error was that I didn't light my fire place for the picture. Darn! It would have looked even better!


Monday, December 19, 2011

Flannel Rag Quilt

I found an image of a flannel baby rag quilt on http://pinterest.com/ and found the original author with tutorial from the blog- Do It Yourself Divas, http://doityourselfdivas.blogspot.com/2011/05/diy-baby-rag-quilt.html. I've been wanting to try it but flannel or material of any kind can be expensive to purchase especially if you want to use multiple colors/patterns. However; a wonderful co-worker hooked me up with a local unique shop call Craft Bits and Pieces, http://www.craftbitsandpieces.com/, which is a unique craft supply store. It takes donations from anyone of art and craft materials and resells the supplies for a very low cost. The proceeds go to a local community center for the elderly and the store is run by volunteers. I found some flannel there and purchased 4 different kinds almost 2 yards each for $1.50 each remnant. I figured with this kind of deal I could afford to try out this quilt project.

The instructions from the Do It Yourself Divas was fairly good, but here's some issues I found that I ran into. First of all I should tell you I'm a mediocre self taught quilter. One of the worst parts of this project was sitting on the floor and trying to accurately cut 3" and 6" strips of the flannel. It was physically painful and I'm in shape! This is why the next time I find some table pads on craigslist or at a yard sale I'm going to be all over purchasing them! The putting together of the quilt was easy, relaxing and fun. The binding was easy just time consuming. So, the second worst part of this project was all of the excess loose threads that come off from the time you cut the material, put it together and bind it. I had to sweep a lot! This was compounded when I took the suggestion from the tutorial to put it through the washer and dryer to help get rid of the excess thread and make it shaggier. However; this was problematic because my washer and dryer needed to be cleaned out afterwards AND the quilt still had a ton of lint/excess thread all over it and it took 20 min. with a lint roller to get most of it off. I'm sure this was because I didn't do something the correct way.

Other than those couple of problem areas this was a fun project and turned out really well. You could do a lot with this idea as far as making larger quilts or using cotton instead of flannel. Also lots of different pattern options. I have enough material to make an entire second quilt if I want to and all for the price of $6.00 total! Not bad!


Saturday, December 17, 2011

Easy Peasy Flower Cuff Bracelet Tutorial


I was meandering around Michaels Craft Store yesterday looking for a new exciting project to cheer me up when I found this metal cuff made by Bead Landing. I then had this idea to search for something to attach to it and found this pendent flower also made by Bead Landing. Using a 50% off coupon I was able to get both pieces of jewelry for $5.50. I found some multi-purpose epoxy and off I went on an experimental fun easy project. Check out the steps below!

**Two things I learned while making this project. Bend the cuff to fit first. My wrist is small and I didn't think to do this until after it was put together (which worked but was more difficult) and think about weight of pendant (the flower is awesome looking but a bit heavy so the bracelet tends to want to slide around).


Materials: Scissors, epoxy, scrap cardboard, popsicle stick or something similar, piece of fine sandpaper and your jewelry pieces.

First: Lightly sand your jewelry where you plan on adhering it together.


Put your two part epoxy on a corner of your cardboard.

Mix the epoxy.

Put plenty of epoxy on all parts of both pieces of jewelry that you will be adhering together.


Hold for 5 minutes or until dry. Hint: If you have an extra sent of hands have someone put a blow dryer over it to help it adhere faster so it will be less likely to move around while drying.

Wear and enjoy!

Tuesday, December 13, 2011

Watercolor Reflections


I recently completed facilitating an Open Studio Art Therapy group. In the final group I asked members to reflect on their group experience and what it was like for them. I created along with the group and this was my piece I shared with them.

As my group members pointed out...there was a lot of "perfect accidents" that occurred through the haphazard mixing of watercolor, markers and stamping with watercolor. What a metaphor for life! Another perfect accident was the creation of a flower smiley face that I didn't see but a group member pointed out. Do you see it?

Right up here ^


Friday, November 25, 2011

Dr. Seuss Inspired End Table

Original Table
I found this end table a few houses up from mine out for the trash. My wonderful boyfriend amused me by helping me to carry it back to my house as I had visions of "trash to treasure" when I laid eyes on it. It was pretty beat up and I didn't notice the hideous leather circle on top until we got it in the house under the light. The first thing I did was was take a pry bar and hammer and get the leather circle off. Then the table sat in my basement for a few weeks not only until I found time to work on it but mostly because I was clueless about how to salvage and refinish the table with the indented circle on top.

Eventually I just had to tell myself it was free so I should experiment all I wanted and the worse thing that would happen is that I put it out on the curb for garbage. So I went to town using materials I already had (the paint, sand paper, crackle finish, vaseline, etc...). I tried some techniques I found online and had wanted to try such as using vaseline to create a distressed look. This didn't look good but I found where the vaseline didn't get wiped away completely it helped to turn things yellowish and helped it to look aged. I ended up using many techniques, sanding worn areas, the vaseline distressed look and a crackle effect. It ended up looking pretty aged in the end.

The circle I of course let blank until it was the last thing to work on so I started by painting it a beige color. Then I took old sheets of music (which I'm sure someone out there would throw a fit about) and ripped them up and decoupaged them to the top. Then I took some images that I had printed out and traced the body of a bird on them, cut them out and placed them on the top. I used a permanent black marker to draw a telephone type of line on the top and to create the birds legs. I used permanent marker to write the Dr. Seuss quote around the birds. The quote reads "Today you are you, that is truer than true. There is no one alive who is youer than you."

I took watered down acrylic brown paint and washed over the circle and then put a clear satin polyurethane over the entire piece. I did many coats on the top and finished it off by pouring a lot of polyurethane onto the edges of the circle were it was indented. The goal was to fill the indention up to create a flat surface and to help make sure the paper would be securely locked into place. A bonus was the edges of the circle became a darker brown than the rest of the circle where there was more polyurethane which helped to aid in the aged/weathered look.

Overall it turned out pretty good and was a positive challenge. By using almost all materials I had around the house I was able to complete the entire project for $5. Purchased materials were drawer knob on clearance and having to buy more crackle finish.

Finished Table


Wednesday, November 23, 2011

Turning Art Into Gifts!

I'm running an Open Studio Art Therapy group at work this semester and it's going really well. Here's one of my own pieces I worked on during the semester. It's on a canvas board and started with old music sheets, watered down acrylic paints and some left over transfer images, stamps and the inside of a bag of tea.

I think it turned out pretty well and quite a few of the students in my group said that I should frame it and give it away for a holiday gift so I took their advice and found this frame at Hobby Lobby; http://www.hobbylobby.com/ for 50% off which met I created this entire project/gift for $15. Not bad!


Sunday, November 13, 2011

My 5 Minute Scarf

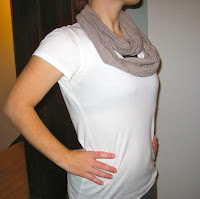
I saw this project/tutorial on Reddit Crafts; http://www.reddit.com/r/crafts/ and thought it looked easy and fun. I finally had a chance to create it today. It was sooooo easy and fun. I would definitely recommend this project to anyone. I went to the Goodwill yesterday and purchased this XL men's GAP shirt for 5 bucks (little pricey) but it was the only one I really liked. The material is very soft and light and the pattern was perfect (brown and white tiny stripes). I would provide the steps here but here is the original Reddit Craft post where the person already gives you step by step instructions;
Below are pics of my starting shirt and views of the finished product. Can't wait to wear it!


Handmade Sterling Silver Ring


In keeping with the intention of continuing to explore and create art, I decided to sign up and take a Sterling Silver Ring making class through a community art shop. This class was through the Memorial Art Gallery Creative Workshop;http://mag.rochester.edu/creativeworkshop/. This was my first time going to this community art center.

I've always wanted to create a ring myself out of metal; but for those people who know me my attempt to audit a graduate level jewelry and metalsmithing class turned out to be a big flop. I did complete a solder plate before dropping out (mainly because the class was completely over my head). This was a big disappointment to me because I just wanted to make a simple ring. So when I found this community class online where you make your own ring in a one day 3 hour class I signed up!

I found out that I had learned something from that graduate level class. I understood the language, general technique and wasn't afraid of the torch any longer. The actual material to make this ring was one piece of 16 gauge sterling silver wire for $5.50! The demonstration was about an hour so I made the ring in about 100 minutes from start to finish. Below is the final product. I was very pleased and really excited about the outcome. It looks and feels professional!


More Toys...


I've continued making toys for The Toy Society; http://thetoysociety.blogspot.com/. Here are some of the new toys. the later (colorful stripped ones I'm actually giving to my two little nieces for Christmas. I practiced with different materials and stitches on these toys. The stripped ones I actually made from a pair of stripped socks. The material was really stretchy and a little challenging but turned out pretty good.


Saturday, November 5, 2011

The Toy Society

I found a conversation on reddit.com/r/crafts a few weeks ago about charities and using your talents to donate handmade goods to these charities. I found the following link for "The Toy Society"; http://thetoysociety.blogspot.com/ and decided this looked like fun so I joined.

The basic philosophy is to create toys that are child friendly, put them in a ziplock bag with a letter explaining about the Toy Society, take a picture of the toy and post it at the "drop box" on the Toy Society website and where you made the "drop". Then hopefully a child or really any person who finds it can log onto the Toy Society website and post a picture or comment about finding the toy. It's a way to hopefully brighten someone's day.

I decided my goal would be to first participate in the Christmas drop, so I've made two toys for that. Then I'd like to create a total of 4 more toys and when I visit with my 4 y/o nephew around New Year's I'm going to have him help me with finding some good drop zones (since he's a frequent flyer at many parks, the Y, and libraries). I think he'll think this is pretty neat.

So below are what I have created so far. I've handmade them using felt and patterned cloth as they are forgiving and I'm not an expert at sewing or creating toys. What do you think?

Oh, on Halloween as I left my driveway I noticed an orange decorative bag on my door step. It turned out to be a "You've Been BOO-ed" greeting. This is similar to the Toy Society drop and find philosophy. The bag had a card and closed store boughten chocolate chex mix in it. You can check this out at; www.BeenBooed.com.


Collage: Mail Art Continued

I finished my community art class about 1 week ago. Below are some updates on other techniques I learned in the class. And things I have continued to make using these techniques.

This was my favorite photogram. It's hard to see but it goes with my bird schema I've been creating lately. It was just a flat paper image of a bird cut out and the background on the paper looked a little veiny. It looks perfect in person and I'm planning on framing it or doing something to showcase it in the future.


Darkroom day! These are already made postcards with the appropriate marks on the back side. You just lay objects down for about 4 seconds in full exposed light, process and there you have it. This was very easy and fun but requires darkroom access. This is called a photogram.


We learned to make decorative envelopes from scratch and how to jazz up a plain store bought envelope. You can find patterns for envelopes on the internet or create your own. *A key is to use glue tape! Works wonders and completely sticks together without wrinkles, having to wait for anything to dry, and totally not messy!


This is using watercolor paints and a sponge, plus stamping, embossing and transferring.

I decided to hand make all of my Christmas cards this year.


Sunday, October 23, 2011

Not So Angry Birds...My Biggest Canvas Painting To Date


I was hosting an art exhibit at work and got inspired by a couple of extremely large pieces of a transfer images of people on a flat bed sheet. I realized I've never worked large and decided I should use this opportunity as a self challenge. So off I went to Michaels with a 40% off coupon on a rainy Friday afternoon.

The canvas I purchased for $20 and then used existing acrylic paints. Just so you have an idea of the size... it was about 4.5 feet by 2.5 feet. The primary method I used was basically using acrylics like they were watercolors and various stamping techniques. I first took green and yellow shads of paint, watered them down and used up and down brush strokes throughout the entire canvas. This was my base coat. Because it was so watered down it created a resistant effect which looked pretty neat.

When the bottom layer had completely dried I then got 8.5 x 11 sheets of paper and cut them in half. I used fall colors (because that was my muse) and using those shades of color I put them one at a time on the half sheets of paper, watered them down then stamped it on the large canvas using my hand to burnish the paint on. I did this over the entire canvas and let it dry.

The third layer was of birds. I found three images online, enlarged them to about 8.5 x 11, printed several of each out and modified them as I cut them out to create simplified images. I took white indoor paint (because I ran out of acrylic white) and put a THICK coat on each image and stamped them on the painting. When the birds were partially dry I took some of the solid block prints and reapplied them over the birds just enough to add some color without covering the images.

And that was it! All done! I'm pretty pleased at the outcome and proud of myself for getting over my fear of large paintings. In hindsight I would have liked to try to add some various words mixed in the layers. I think that could have added an interesting look. Perhaps my next painting I'll give it a whirl!

Below are some of the steps but not all to this process. Sorry I forgot to take pictures each step of the way.